Frequently Asked Questions
FAQs
This page contains tip and solutions to common problems students experience in Android development
-
How do I create a Java project in Android Studio?
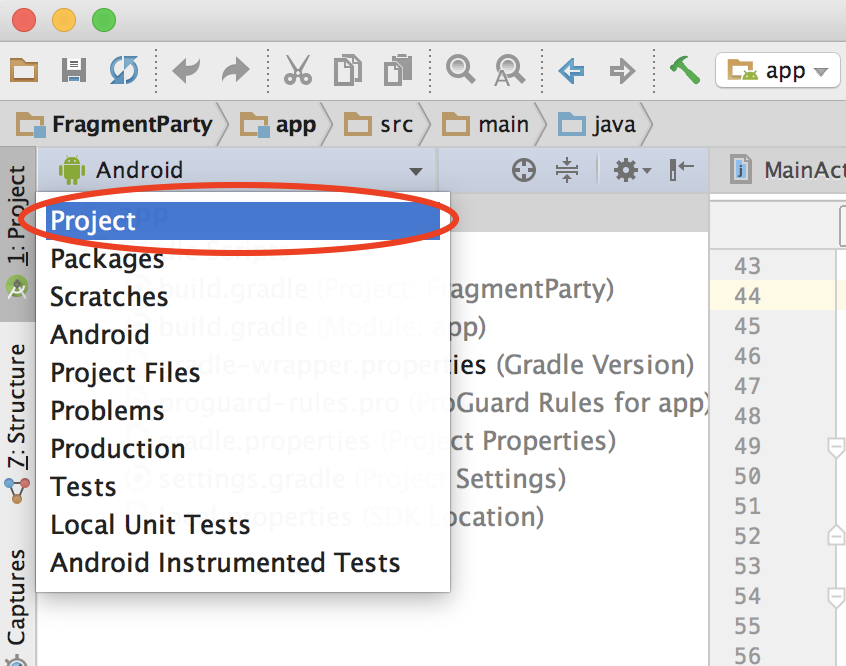
- Run Android Studio and create a new project (File -> New -> New Project).
The default options should be sufficient. This will create a new project with 2 folders, "ProjectName" and "Gradle Scripts".
If you don't see these folders on the left, click "1:Project" on the left pane to open the project browser.
Inside the "ProjectName" folder you will see a module named "app"
and a couple other folders (namely ".gradle", ".idea", and "gradle").
The "app" module is, of course, an Android app. For a non-Android project, this module
(and the other folders) are not needed, but having it there doesn't hurt anything either.
- Note: If Android Studio wants to update/install anything it's generally a good idea to let it try to
update whatever it can.
- If Android Studio gives you any build errors at this point, you may have to go into Gradle Scripts ->
build.gradle(Module: app) and update the SDK versions.
- Within the new project create a new module (File -> New -> New Module). For the module type select "Java Library".
This new module will contain the non-Android code for the project, and should be named accordingly. (For example,
if you were developing the Family Map Server, you might call this module "server".)
- You should have a new folder in your project representing the module you just created. Inside this folder should be a "libs" and "src" folder.
To find where to put your java code open the src folder and navigate as follows. src -> main -> java -> (Your Username) -> (Your ProjectName). Use this folder for your java files.
- Android Studio may have created a package in the new module named com.example, we reccomend deleting this package and its contents.
- To run the new main method, in the tree view on the left, navigate to the new class (e.g., "MyClass"), right-click on it,
and select either "Run MyClass.main" or "Debug MyClass.main" to either run or debug the program.
- To insert command line arguments, on Android Studio's top bar, click on the down arrow next to the play button, then "Edit Configurations". Then type the arguments in the "Program Arguments" field located in "Application" folder to the side.
-
How do I receive TA help?
- Go here to get in the queue.
- For a full list of policies go here.
- If you are asking for clarification, please read the specifications in full before asking for help.
- If you are asking for help in debugging you must do each the following: Spend at least 30 min. working on your own, Google the question, READ YOUR BOOK.
- Also, if the TAs are in the labs other than during their posted hours, they're doing homework for other classes.
- Remember one purpose of this class is for you to learn how to learn. If we feel you are not putting forth your full effort or for any other reason we may ask you to return later when you ave fulfilled these requirements.
-
How do I pass off the first three labs?
- We will be running a test driver from the TA machines, in order to do this we will need to know the file path to the source files from your home directory on the lab machines.
- We recommend copying all .java files you have created into a temporary folder in your home directory on the lab machines.
- Make a note of the file path then enter the queue for pass off.
- Remember any changes you make to your code will not affect the code in the temporary file so you will need to re-copy them over.
-
My Javadocs are not showing up even though they are in my public_html
- Be sure you have changed the file permissions so that the public can view them. To do this try using "chmod 755 -R ~/public_html"
-
How do I look at my SQLITE database?
- Here is a usefull Application you can use for Windows, Mac and Linux here
-
I have no idea how to use SQLITE, what should I do?
- This website here has great java examples for most SQLITE commands.
-
How do I use Jars (SQLite, GSON, JUnit, etc.) in Android Studio?
- The solution is to download a copy of the .jar file from the web.
- Put it in the root folder of your project (or anywhere else you like).
- Create a "New Module" in your project of type "Import .JAR/.AAR File", and point it at the .jar file in your project.
- In the "Project Structure" dialog, to your java module (e.g. 'server') add a module dependency on the new Jar module you created in the previous step.
- Your project should now be able to work with the .jar file's resources (provided you have the correct import statements in your .java files)
OR
- The solution is to download a copy of the .jar file from the web.
- Put it in the libs folder of your desired module. (If you can't find this folder, make sure you're using the project view)
- In the "Project Structure" dialog, to your java module (e.g. 'server') add a jar dependency on the new .jar file from the previous step.
- Your project should now be able to work with the .jar file's resources (provided you have the correct import statements in your .java files)
-
How do I auto-generate and run Test Cases for my code in Android Studio?
- In order to set up test cases with JUnit in Android Studio first navigate to the class you want to make test cases for
- Click or double click on the name of the class within the code editor
- A yellow lightbulb should appear on that line of code, click it and select "Create Test"
- A window will pop up with several fields. Select a version of JUnit (such as JUnit 4) for your tests
- Pick a class name and a destination package
- Under the "Generate" set up select "setUp/@Before" and "tearDown/@After"
- Select the functions that you wish to test and click "OK"
- Now you can navigate to your tests folder and find the package name that you chose for your tests
- You should be able to find your test class within this package
- After writing your test cases you can click the double green arrow to the left of the class definition line to run your test cases and see if they work
-
How do I generate a personID, eventID, or Authorization Token?
- You can use UUID.randomUUID().toString() to generate a string of length 36 consisting of uppercase letters, lowercase letters, and numbers.
-
My URL looks right, but it says I can't connect to the server?
- Make sure your server is running
- Make sure your
AndroidManifest.xml to allow access to the internet (see here)
- Make sure your device is on the same network as the computer running the server. We find it works best if both machines are on the CS dept. WiFi. This is what the lab machines run on.
- The server gives several options for IP addresses; try different ones if it is still not working.
-
My map shows up as a gray box with the google symbol in the bottom left. What is going wrong?
- Consult the Maps Troubleshooting Guide for tips on how to resovle this issue.
- Check your android monitor to see if it is reporting a invalid key error. If so go here and get a new key. Replace the key in your manifest with this key.
- If you are on campus be sure your device is on the CS Department WiFi. When you sign in it will ask for your netId and CS password. BYU Secure will work for some people. BYU guest does not work.
-
How do I use Google Maps with Android Studio?
- Google itself has a great tutorial here.
- We recommend that you create a new project to follow the tutorial then apply it to your own code.
- To create the Google maps activity we recommend you use New-> Activity-> Gallery-> Google Maps Activity. This will update the Android manifest and generate an XML for you.
- Follow the instructions in the generated XML and android manifest as to how to add the app to the registry.
- If you are on campus we find it works best if you are connected to the CS dept. WiFi.
-
How do I use Amazon Maps with Android Studio?