 Lab 08 - BST
 (11/01/2021)
Description
"A binary search tree (BST), which may sometimes be called an ordered or sorted binary tree, is a node-based data structure where each node references a value, a left child, and a right child.
In a Binary Search Tree, the left subtree of a node contains only nodes with values less than the node's value, the right subtree of a node contains only nodes with values greater than the node's value, there are no duplicate nodes, and both left and right subtrees of a node must also be binary search trees."
Learning Outcomes
By completing the Binary Search Tree lab, you will be able to:
- Develop a Binary Search Tree data structure that performs several standard operations using recursion.
- Use pointer references as parameters to function calls to modify pointers in the tree.
- Implement deep constructors, destructors, and assignment operators.
- Handle memory management in C++
Discussion
Binary Search Tree
To find a node in a binary tree:
- if node is NULL, return false.
- if node.value == value, return true.
- if value < node.value, return search(node.left, value).
- if value > node.value, return search(node.right, value).
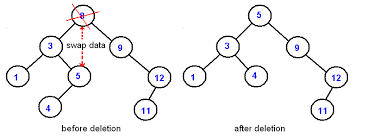
Node Removal
To remove a node with value of data from a binary tree:
- if node is NULL, return false.
- if data < node.data return delete(node.left, data).
- if data > node.data return delete(node.right, data).
- exchange node.data with (in-order) predecessor.data.
- return delete(node.data, data).
Deep vs. Shallow Copy
The Gang of Three rule states that if a class defines one (or more) of the following, it should probably explicitly define all three:
- Destructor – call the destructors of all the object's class-type members.
- Copy constructor – create new object members from corresponding member constructors.
- Copy assignment operator – assign corresponding members from existing members.
Default constructors, destructors, and assignment operators do shallow copies. You need to explicitly create user constructors, destructor, and assignment operators when a deep copy is needed (class contains pointers to dynamically allocated resources).
- The copy constructor is called when a new object
is created from an existing object, as a copy of the existing object.
Such is the case when passing an object as an argument to a function (by value) or
returning an object (by value) from a function:
MyClass t1, t2;       // default constructor
MyClass t3 = t1;      // copy constructor (t3 is new)
- The assignment operator is called when an already initialized object
is assigned a new value from another existing object.
t2 = t1;              // assignment operator (t2 exists)
t2.operator=(t1);     // assignment operator (equivalent)
- A deep destructor is needed if a class contains pointers to dynamically allocated resources. Otherwise a memory leak occurs.
Note: You will need a deep copy constructor, destructor, and assignment operator to use your BST in an ordered set implementation.
Destructor
Destructors contain code that is run whenever an object is destroyed. Each class has a default destructor, which effectively invokes the destructor for each data field. If the object references a dynamically allocated object, the memory allocated to that object must be freed.
Be sure to add a deep destructor to your BST class to avoid memory leaks.
Copy Constructor
We want a copy of an object to be an independent copy, which means we should be able to modify one of the objects without affecting the other. Copying of primitive types is straightforward—the values are duplicated and placed in the target locations. Without a deep copy constructor, destructing an object that was shallow copied would run the destructor twice on the same object (once for the original and once for the copy) - a source for trouble!
For class types, copying is done by a class's copy constructor:
MyClass(const MyClass& other);
The copy constructor is invoked automatically:
- when an object is passed to a function by value.
- when an object is returned from a function.
- when an object is initialized with another object of the same class.
- when the compiler generates a temporary object.
Be sure to add a deep copy constructor to your BST class.
Copy Assignment Operator
The assignment operator (operator=) is called when an already initialized object is assigned a new value from another existing object. For class types, the assignment operator signature looks like:
MyClass& operator=(const MyClass& other);
Every class has a default assignment operator which makes a copy of each source data field and places it into the corresponding data field of the target. The default assignment operator makes a shallow copy of an object, so we must override it if we want truly independent copies.
Be sure to add a deep assignment operator to your BST class.
BST Iterator
Iterators open the door for expression, readability, maintenance and reusability. How do I create a custom iterator?
- First, you have to decide how to define the state of your iterator and how to define begin and end conditions.
- Then, you have to decide what the contents of the iterator will be. In other words, you have to decide on the value type, when the iterator is dereferenced.
How many functions must a custom iterator implement?
- Iterators should have a constructor and destructor.
- Iterators should be comparable. (When have I reached the end of the container items?)
- Iterators should dereference to a data item.
- Iterators should increment (and decrement if possible).
- Iterators should be instantiable with begin() and end() functions.
Iterates are generally implemented as a nested class. Nesting a class within another class does not give special access privileges to member functions of the nested class. Similarly, member functions of the enclosing class have no special access to members of the nested class.
An outline of the BST class with an iterator could look like:
#include "BSTInterface.h"
template<typename T>
class BST : public BSTInterface<T>
{
private:
   struct Node { ... };
   Node* root_;
public:
   BST() { this->root_ = NULL; }
   ~BST() { clearTree(); }
   /** BST iterator */
   class Iterator
   {
   private:
      // private iterator state...
      Node* root_;
   public:
      Iterator(Node* root) : root_(root),... {}
      ~Iterator() {}
      bool operator!=(const Iterator& rhs) const { ... }
      Iterator operator++(T) { ... }
      T operator*() const { ... }
   };
   Iterator begin() const { ... }
   Iterator end() const { ... }
};
The BST iterators may be used as follows:
if (item1 == "find")
{
   BST<int>::Iterator iter = intBST->begin();
   BST<int>::Iterator end_iter = intBST->end();
   while (iter != end_iter)
   {
      if (*iter == stoi(item2))
      {
         out << "found";
         break;
      }
      ++iter;
   }
   if (iter == end_iter) out << "not found";
}
else if (item1 == "tree")
{
   out << endl << "iterate: ";
   BST<int>::Iterator iter = bst.begin();
   BST<int>::Iterator end_iter = bst.end();
   if (iter == end_iter) out << " empty";
   for (; iter != end_iter; iter++)
        out << " " << *iter;
}
The Lab
Lab Requirements:
- The BST class must publicly inherit from the BSTInterface template interface class.
- Use commands from the input file to add (add {node}), remove (remove {node}), clear (Clear), and output tree in level-order (print).
- Report results of add, remove, and clear commands with OK if successful or Error if command failed. Also report "empty" when outputting an empty tree.
- There are multiple correct methods for removing nodes from a tree, which may result in different trees. When removing nodes, use the method described on page 476 of the course text (i.e. when removing a node with only one child, replace that node with its child and use the in-order predecessor when removing nodes with two children).
- Remember to disallow adding duplicate entries and removing nodes not in the tree. (Both cases are reported as Error.)
- NO STL CONTAINERS MAY BE USED IN THIS LAB!
The following summarizes the commands used in the BST lab:
| COMMAND | DESCRIPTION | OUTPUT |
|---|---|---|
| INT | Instantiates a BST |
OK |
| STRING | Instantiates a BST |
OK |
| add <data> | Add data node to BST. Return Error if duplicate. | OK |
| remove <data> | Remove node from BST. | OK |
| clear | Delete all nodes from the BST. | OK |
| size | Output the number of nodes in the BST. | Number of BST nodes |
| Print BST (using insertion operator) in level-order. Return empty if BST contains no elements. | Level-order listing of BST
empty |
|
| find <data> | Find node in BST. Return "found" or "not found". | found
not found |
| copy | Make a deep copy of the current BST. | OK |
| printcopy | Print the deep BST copy (created by the copy command) in level-order. | Level-order listing of BST empty |
| tree | Output the in-order contents of the BST using begin() and end() iterators with iterator operators ++, *, and !=. | In-order listing of BST empty |
NOTE: Return "Error" on all commands except "INT" and "STRING" if no BST has been instantiated.
Steps to Success.(collapse)
- Step 1 - Begin with a main function.
- The input file name is specified in argv[1] and the output file name is specified in argv[2].
- For debugging purposes, if there is no output file specified (argc == 2), use cout.
- Parse input lines into appropriate command blocks. Stub out calls to your BST class.
- Compile and fix any errors.
- Step 2 - Design and implement a Node Class/struct.
- structs are lightweight objects and often used in place of a class if the object's main responsibility is a type of data storage. A node represents a single value, is similar to a primitive type, is mutable, and relatively small, and hence a good candidate for a struct - your choice.
- Remember, a node in a Binary Search Tree needs to provide access to its left and right children and the data it contains.
- If the node links are made private, implement appropriate getters and setters. Alternatively, you could make Node a nested-class of BST (like we did in Linked List), or list BST as a friend class to Node.
- Step 3 - Design and implement the BST Class.
- Plan out what member functions you want for your Binary Search Tree class.
- Instantiate BST template object pointers before parsing input commands. Make one set of INT and STRING object pointers for add, remove, clear, size, print, and find commands, and another set of INT and STRING object pointers for copy, printcopy commands.
- Set the BST mode with the "INT" and "STRING" commands and instantiate (and delete old if needed) corresponding BST template objects.
- Implement one member function at a time and call the BST function when the corresponding input command is encountered (according to the mode.)
- Create your own test cases to incrementally test new functionality.
- Step 4 - Verify Results.
- When you've completed the incremental testing, test and verify all test cases before submitting your lab.
- Verify that your files pass the Lab Style Review criteria.
- Be sure to verify that there are no memory leaks!
- Zip all source files and submit your lab.
- Verify the results of the submission compilation are correct. Fix any problems and re-submit if necessary.
- Step 5 - If implementing "tree" bonus:
- Implement a BST iterator as a nested class of the BST class.
- The iterator class must include a dereferencing operator (*), a pre-increment operator (++), and a not-equal operator (!=).
- Add a toString() function and friend insertion function that returns the current state of the iterator.
- Implement BST public functions begin() and end() that return instantiated iterators pointing to the beginning of the BST elements and an element not in the BST, respectively.
- The "tree" command should be implemented with code similar to:
else if (item1 == "tree") { out << endl << "iterate: "; BST<int>::Iterator iter = bst.begin(); BST<nt>::Iterator end_iter = bst.end(); if (iter == end_iter) out << " empty"; for (; iter != end_iter; iter++) out << " " << *iter; } - Zip all source files and submit your lab for the extra credit.
- Verify the results of the submission compilation are correct. Fix any problems and re-submit if necessary.
Helps and Hints
Note: Code examples come from readily available, public websites (ie., stackoverflow.com, cplusplus.com, etc.)
Online BST Visualization.(collapse)
- You can find Wikipedia Binary Search Tree algorithms here.
Level Order Traversal of a BST.(collapse)
A binary tree is one where each node has at most two children, named left and right. The level of a tree is the number of parent nodes a tree node has. Thus, the root of the tree is at level 1. The root's children are at level 2, grandchildren are at level 3, etc.
Trees can be traversed in level-order by visiting every node on a level before going to a lower level.
/** Output nodes at a given level */
bool outLevel(Node<T>* root, int level, stringstream& out) const
{
   if (root == NULL) return false;
   if (level == 1)
   {
      out << " " << root->data_;
      if ((root->left_ != NULL) || (root->right_ != NULL)) return true;
      return false;
   }
   if ((level == 2) && !root->left_ && root->right_) out << " _";
   bool left = outLevel(root->left_, level - 1, out);
   bool right = outLevel(root->right_, level - 1, out);
   if ((level == 2) && root->left_ && !root->right_) out << " _";
   return left || right;
} // end outLevel()

/** Return a level order traversal of a BST as a string */
string toString() const
{
   stringstream out;
   if (root_ == NULL) out << " empty";
   else
   {
      int level = 0;
      do
      {
         out << endl << "  " << ++level << ":";
      } while (outLevel(root_, level, out));
   }
   return out.str();
} // end toString()
Understanding Valgrind Output.(collapse)
- You can find helpful hints and explanations of Valgrind output here.
BST Grading Criteria
Instructions for submitting your lab:
- Zip all your lab source files (.cpp, .hpp, .h) into one folder. DO NOT INCLUDE YOUR WHOLE PROJECT!
- Submit your zipped lab source using the "Labs" tab on the class website.
- Your submitted lab source will be compiled and executed using a lab gcc compiler.
- Both input and output files will be specified by command line arguments.
- An auto-grader will compare your output files with expected results and you will shortly receive an accumulative score.
- The auto-grade process may abort on the first error. If so, correct the error and try again.
- You may re-submit your zipped source as many times as you like.
While you are encouraged to develop your own test cases, you may use the following input and resulting output files in testing the BST lab.
| Input File | Output File | |
| Test #1 | lab08_in_01.txt | lab08_out_01.txt |
| Test #2 | lab08_in_02.txt | lab08_out_02.txt |
| Test #3 | lab08_in_03.txt | lab08_out_03.txt |
| Test #4 | lab08_in_04.txt | lab08_out_04.txt |
| Test #5 | lab08_in_05.txt | lab08_out_05.txt |
| Test #6 | lab08_in_06.txt | lab08_out_06.txt |
The auto-grader will be expecting to find in your output file the following sections:
|
Fail |
Pass |
||
|---|---|---|---|
The lab source will be peer reviewed using the following rubric:
|
No |
Partial |
Yes
|
||
|---|---|---|---|---|
| Overall Rating |
Easy to follow, readable, organized, and
well commented. |
|||
|
***NOTE: Any attempt to circumvent any lab requirement (ie, hard coding output, using loops instead of iterators where required, modifying a class interface, etc.) will be reported by peer reviewers and result in a zero score for the lab. |
||||