 Lab 07 - 3D Maze
 (10/28/2020)
Description
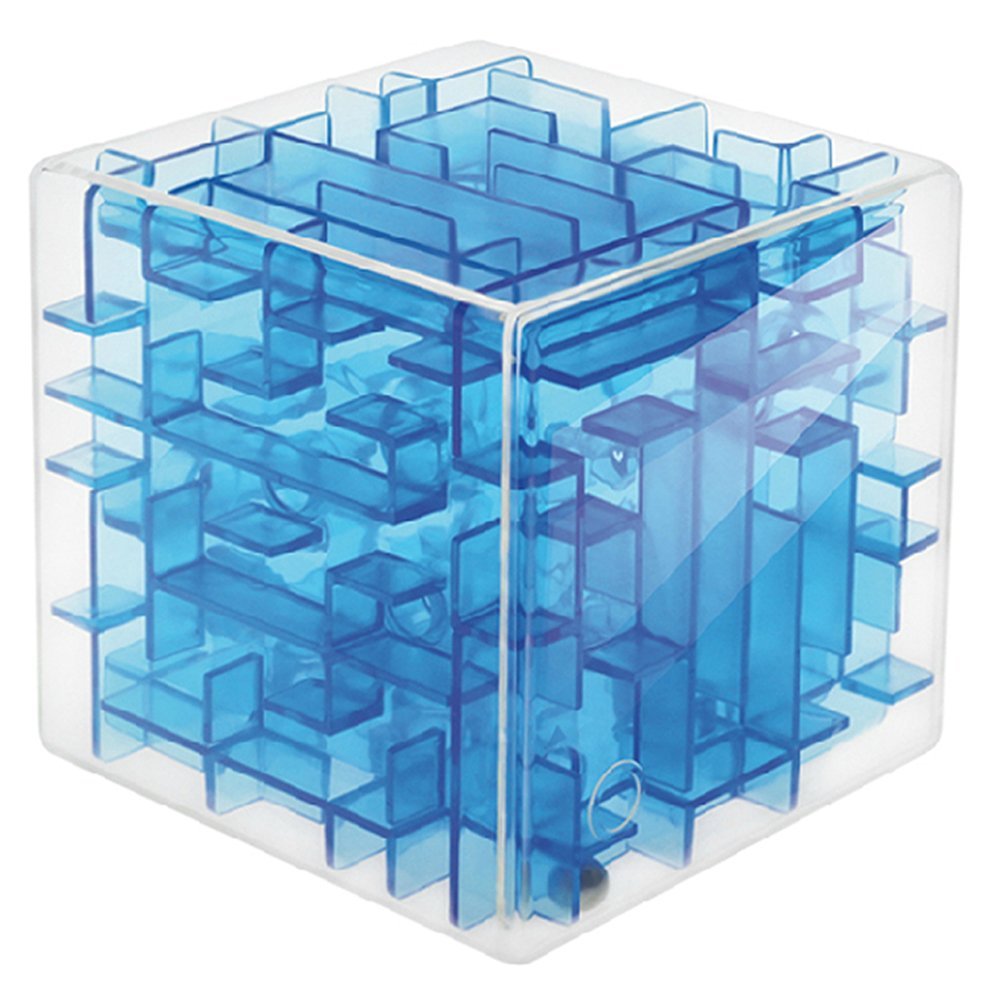
"Two SCUBA diving buddies have encountered a large, box-shaped storage facility inside the hull of the Heian Maru, a 512' submarine tender lying on the bottom of Truk Lagoon at 108'. The storage facility is composed of cells, some of which can be entered and some which cannot. The only exterior walls that are missing are on the front of the storage facility in the upper left corner, and on the rear of the storage facility in the lower right corner. The divers wish to determine a path through the storage facility. Use recursion to find a path through the maze or to prove that there is no path."
Learning Outcomes
By completing the 3D Maze Lab, you will be able to:
- Use recursion to solve complex problems.
- Take a real world problem and create an algorithm to solve it.
- Use recursive backtracking to solve a problem.
- Dynamically allocation a multi-dimensional array.
Discussion
Backtracking
Backtracking is an approach to implementing a systematic trial and error search for a solution. An example is finding a path through a maze. If you are attempting to walk through a maze, you will probably have many decisions to make at path junctions as to which path to take when there is more than one option. You hope to always pick the right path that will lead you out of the maze. However, inevitably you will end up choosing a non-solution path and encounter a "dead end". At that point you will have to "backtrack" to the last decision point and try another path. Eventually, you will reach your destination and exit the maze, or you discover there is no way out of the maze and you end up back where you started.
Backtracking is a systematic, non-repetitive approach to trying alternative paths and eliminating them if they don’t work. If you never try the same path more than once, you will eventually find a solution path if one exists. Problems that are solved by backtracking can be described as a set of choices made by some function. Recursion allows you to implement backtracking in a relatively straightforward manner. Each activation frame is used to remember the choice that was made at that particular decision point. A program used to solve a maz or play a decision game (such as chess) usually involves some kind of backtracking algorithm.
The Maze
The Maze class has-a 3 dimensional dynamic array that indicates whether a cell can be entered (OPEN), is walled off (BLOCKED), is part of the path (LEFT, RIGHT, UP, DOWN, OUT, IN) through the maze, is the maze exit cell (EXIT), or is a cell that has already been visited (VISITED). A enum statement allows the compiler to define these enumerations:
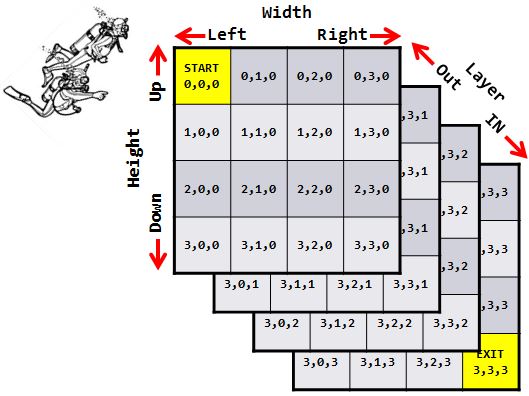
enum CellValue_t { OPEN, BLOCKED, VISITED, EXIT, LEFT, RIGHT, UP, DOWN, OUT, IN };The maze size is defined by height x width x layer as specified on the first line of the test file. The 3 dimensional dynamic array is represented as 2 dimensional height x width layers as follows:
Dynamic Arrays.
A dynamic array is basically an array of pointers to arrays. A 2 dimensional 10 x 10 dynamic array is created using a loop as follows
int height = 10;
int width = 10;
int **myArray = new int*[height];
for(int i = 0; i < height; ++i)
{
    myArray[i] = new int[width];
}
Since new is used in creating the dynamic array, all width arrays must be deleted followed by the height array to prevent memory leaks:
for(int i = 0; i < height; ++i)
{
delete [] myArray[i];
}
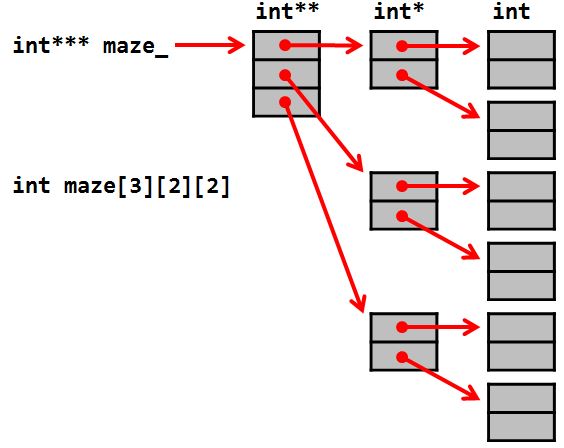
delete [] myArray;The 3D maze array is of data type "int***" - that's right, a pointer to a pointer to a pointer to an int. The following diagram illustrates the memory layout for a 3 x 2 x 2 dynamic integer array:
The Lab
Lab guidelines:
- The format of a Maze input file ia as follows:
- First row is the height, width, and number of layers of the maze.
- Next follows the height x width values for each layer, beginning with a blank line and
followed by the number 0 or 1 for each width value.
- A 0 indicates an open path (can enter) and
- A 1 indicates a closed path (blocked).
- The top-left (start) and bottom-right (exit) cells are always open (0).
- Your find_maze_path function should be able to solve any size array.
- To match the output files exactly, recurse in the following order: left (width - 1), right (width + 1), up (height - 1), down (height + 1), out (layer - 1), and in (layer + 1).
Lab requirements:
- You are,required to write a Maze class that inherits from the provided MazeInterface, available at the top of this page. Comments in MazeInterface.h explain exactly what each function should do.
- Your Maze class should contain a recursive and wrapper find_maze_path function.
- The maze output consists of height x width layers, with:
- Each new layer is preceded by "Layer #".
- Unvisited open cells are output as an underscore character ("_").
- Visited cells not on the path are output as an asterisk character ("*").
- Blocked cells are output as the character "X".
- The solution path is output as either a 'L', 'R', 'U', 'D', 'O', or 'I' character.
- The exit cell is output as the 'E' character.
- Put a space between each cell character value.
- The overloaded find_maze_path functions are found inside the Maze class along with the setValue and toString functions.
- Use the Maze toString method to output the maze before and after finding a path through the maze.
- The following is an example of the output from a 2 x 2 x 2 maze:
Solve Maze:
Layer 1
 _ _
 _ X
Layer 2
 X _
 X _

Solution:
Layer 1
 R I
 _ X
Layer 2
 X D
 X E
- NO STL CONTAINERS MAY BE USED IN THIS LAB!
- REMEMBER: To match the output files exactly, recurse in the following order: left (width - 1), right (width + 1), up (height - 1), down (height + 1), out (layer - 1), and in (layer + 1).
Steps to Success:
Steps to Success:
- Step 1 - Begin by writing a main function.
- Open input and output files.
- Read through the input files and output the strings to verify the input.
- Step 2 - Create your Maze class.
- The Maze class should be derived from the MazeInterface class.
- Stub out all required virtual functions (temporarily.)
- Verify everything compiles.
- Step 3 - Use a Maze constructor to dynamically allocate a maze array.
- Write a Maze constructor with 3 arguments: height, width, and the number of layers.
- Dynamically allocate memory for the maze array.
- (Don't forget to delete the memory with the destructor or a memory leak will result.)
- Use the first line of an input file to instantiate the correct size of the Maze class array.
- The input file might look like the following where 0 is an open cell and 1 is a blocked cell:
4 4 4

0 0 0 0
0 1 1 1
0 1 1 1
0 1 1 1

0 0 0 1
1 1 1 1
1 1 1 1
0 1 1 1

0 0 1 0
0 1 1 0
0 1 1 1
0 1 1 1

1 0 1 1
1 0 1 1
1 0 1 1
1 0 0 0
- Step 4 - Implement your Maze class toString() method.
- Writing the toString() function early on will allow you to verify that you are correctly reading the input values.
- Be sure the maze you output matches the format in the lab requirements.
- The output of the above 4 x 4 x 4 maze should be as follows:
Solve Maze:
Layer 1
 _ _ _ _
 _ X X X
 _ X X X
 _ X X X
Layer 2
 _ _ _ X
 X X X X
 X X X X
 _ X X X
Layer 3
 _ _ X _
 _ X X _
 _ X X X
 _ X X X
Layer 4
 X _ X X
 X _ X X
 X _ X X
 X _ _ _
- Step 5 - Write your find_maze_path() functions. Overload the function such that there
is a "wrapper" or "starter" function and a recursive function.
- Note that the wrapper find_maze_path() function does not take any parameters, which means it will not work recursively.
- Because find_maze_path() is only a starter function, you will also need to write the actual recursive function. (See the textbook for an example of the wrapper and recursive functions for a 2D maze.)
- ALWAYS use enum values for OPEN, BLOCKED, VISITED, EXIT, and PATH cell values!
- To solve a maze, you will need to be able to mark cells that have already been visited. One common error students make is to mark cells with numbers and not enum values. Such practices make debug very difficult!
- The output of the above 4 x 4 x 4 solved maze should be as follows:
Solution:
Layer 1
 R R I *
 _ X X X
 _ X X X
 _ X X X
Layer 2
 I L L X
 X X X X
 X X X X
 _ X X X
Layer 3
 R I X _
 _ X X _
 _ X X X
 _ X X X
Layer 4
 X D X X
 X D X X
 X D X X
 X R R E
- Step 6 - Your maze program outputs the solution path.
- Use the underscore character '_' for unvisited cells and the asterisk character '*' for visited cells not on the path.
- Use the following characters to show the path thru the maze:
- 'L' for move left (width - 1)
- 'R' for move right (width + 1)
- 'U' for move up on the same layer (height - 1)
- 'D' for move down on the same layer (height + 1)
- 'O' for move to the previous layer (layer - 1)
- 'I' for move to the next layer (layer + 1)
- In addition, use the character 'E' to indicate the exit point.
- The output of the above 4 x 4 x 4 solved maze should be as follows:
Solution:
Layer 1
 R R I *
 _ X X X
 _ X X X
 _ X X X
Layer 2
 I L L X
 X X X X
 X X X X
 _ X X X
Layer 3
 R I X _
 _ X X _
 _ X X X
 _ X X X
Layer 4
 X D X X
 X D X X
 X D X X
 X R R E
- Step 7 - Test your program with the provided input files.
REMEMBER: To match the output files exactly, recurse in the following order:
- left (width - 1)
- right (width + 1)
- up (height - 1)
- down (height + 1)
- out (layer - 1)
- in (layer + 1)
Helps and Hints
Videos:
- You may find watching a video from a previous semester helpful in describing
the maze setup (Part I).
However, the video pseudo code for the findPath function that
uses a vector<string> as a stack of x, y, and z coordinates
is NOT recommended (and not needed)!
The activation record already stacks function arguments.
Click here to watch the video.
- Note that the dynamically allocated maze is a private data member of the Maze class
and need not be passed to the findPath function, only the current cell coordinates.
(The class lecture describes a standalone findPath function that needs the maze as
an argument to the function.)
Leaving behind "bread crumbs" in the maze is a much cleaner and straight forward
way to solving the maze.
Click here to watch a previously recorded lecture video on backtracking.
File Input and Output:
- Use argv[1] for input and argv[2] for output.
if (argc < 3)
{
   cerr << "Please provide name of input and output files";
   return 1;
}
cout << "Input file: " << argv[1] << endl;
ifstream in(argv[1]);
if (!in)
{
   cerr << "Unable to open " << argv[1] << " for input";
   return 1;
}
cout << "Output file: " << argv[2] << endl;
ofstream out(argv[2]);
if (!out)
{
   in.close();
   cerr << "Unable to open " << argv[2] << " for output";
}
Understanding Valgrind Output.(collapse)
- You can find helpful hints and explanations of Valgrind output here.
3D Maze Grading Criteria
Instructions for submitting your lab:
- Zip all your lab source files (.cpp, .hpp, .h) into one folder. DO NOT INCLUDE YOUR WHOLE PROJECT!
- Submit your zipped lab source using the "Labs" tab on the class website.
- Your submitted lab source will be compiled and executed using a lab gcc compiler.
- Both input and output files will be specified by command line arguments.
- An auto-grader will compare your output files with expected results and you will shortly receive an accumulative score.
- The auto-grade process may abort on the first error. If so, correct the error and try again.
- You may re-submit your zipped source as many times as you like.
Use the following input and resulting output files in testing the 3D Maze lab.
| Input File | Output File | |
| Test #1 | lab07_in_01.txt | lab07_out_01.txt |
| Test #2 | lab07_in_02.txt | lab07_out_02.txt |
| Test #3 | lab07_in_03.txt | lab07_out_03.txt |
| Test #5 | lab07_in_05.txt | lab07_out_05.txt |
The auto-grader will be expecting to find in your output file the following sections:
|
Fail |
Pass |
||
|---|---|---|---|
The lab source will be peer reviewed using the following rubric:
|
No |
Partial |
Yes
|
||
|---|---|---|---|---|
| Overall Rating |
Easy to follow, readable, organized, and
well commented. |
|||
|
***NOTE: Any attempt to circumvent any lab requirement (ie, hard coding output, using loops instead of iterators where required, modifying a class interface, etc.) will be reported by peer reviewers and result in a zero score for the lab. |
||||