VirtualBox Tutorial
Step 1: Downloading Linux
Step 2: Downloading and Installing VirtualBox
Step 3: Setting up a Virtual Machine
Step 4: Installing Ubuntu on the Virtual Machine
Step 5: Installing the Ubuntu Guest Additions
Step 6: Go Exploring!
VirtualBox is a free program that can be used to run Linux inside a virtual machine on a Windows computer. This tutorial should help you get started with VirtualBox and set up a Linux machine so that you can program on your own computer in a Linux environment. Please note that the TA's will not help you with VirtualBox or other virtual machine problems--this tutorial is provided for the adventurous and is by no means required, nor is this the only way to run Linux on your own computer. This is just one fairly simple way to do it.
Step 1: Downloading Linux
The first thing you're going to want to do is start downloading a Linux distro, because that generally takes the most time. Ubuntu is a free Linux based OS available for download that seems to be fairly user friendly, and is a pretty good choice for getting used to Linux. The way that Ubuntu does their versions can be kind of confusing at first. It might be good to read the first part of this Wikipedia article that explains it, including the Naming Convention.
When downloading Ubuntu, you basically have two options for the version
- the latest release, which has all the latest and greatest features, but might be less stable
- the last Long Term Support (LTS) version, which might not have all the newest features, but is usually less prone to having problems.
Note that sometimes these are the same version. I would recommend getting the LTS release, especially if you are new to Linux.
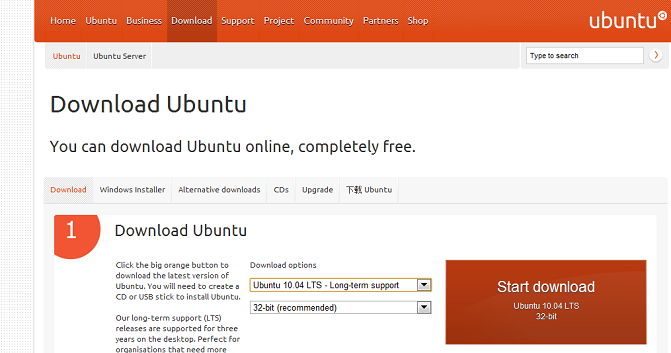
Make sure to download the .iso file from the section marked "Download and Install." I would recommend NOT downloading the Windows installer (Wubi), because it uses its own virtualization/booting program, and it sometimes causes problems. We want the .iso CD image file that has the Ubuntu installer on it, which we'll attach to our virtual machine later.
Step 2: Downloading and Installing VirtualBox
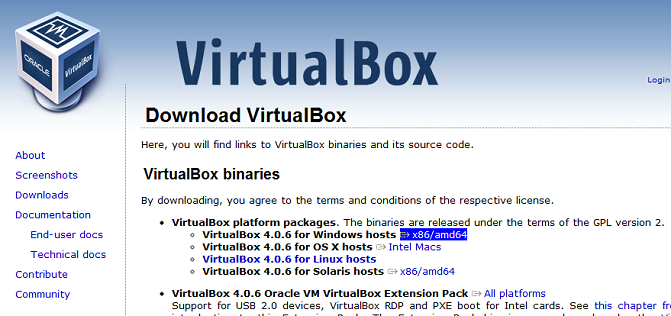
Once you have Ubuntu downloading, the next step is to get VirtualBox and install it. Go to the VirtualBox Download page and download the latest version of VirtualBox for Windows hosts.
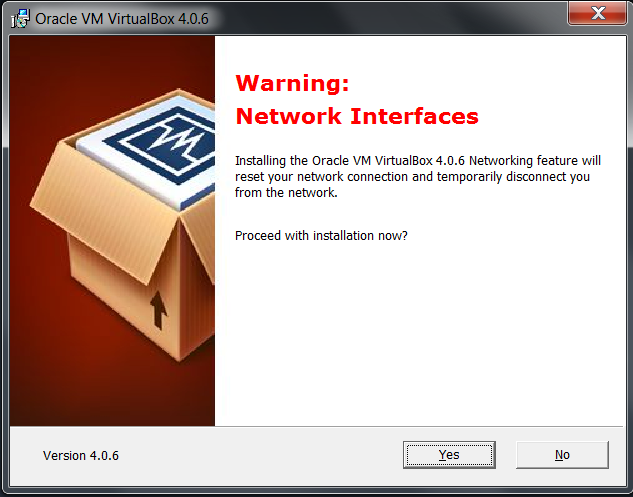
Run the installer once it's downloaded and follow the instructions to install the program. When the installer gives you the warning about resetting the network connection, click Yes (your Ubuntu download should be fine).
Step 3: Setting up a Virtual Machine
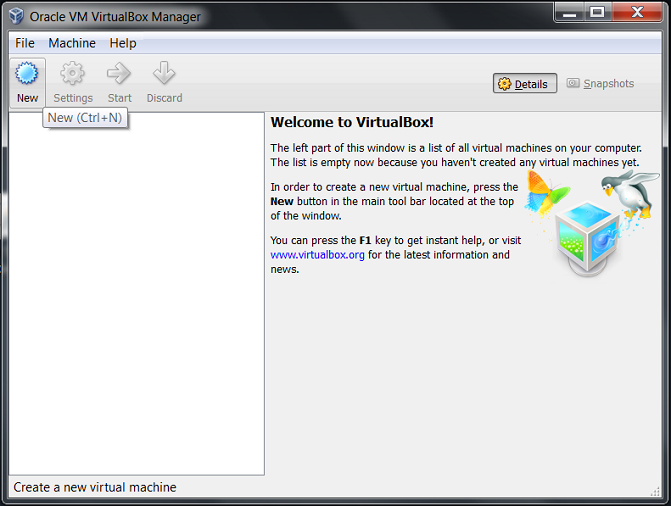
When you run the program for the first time, there won't be any virtual machines in your list. Click on the New button to create one.
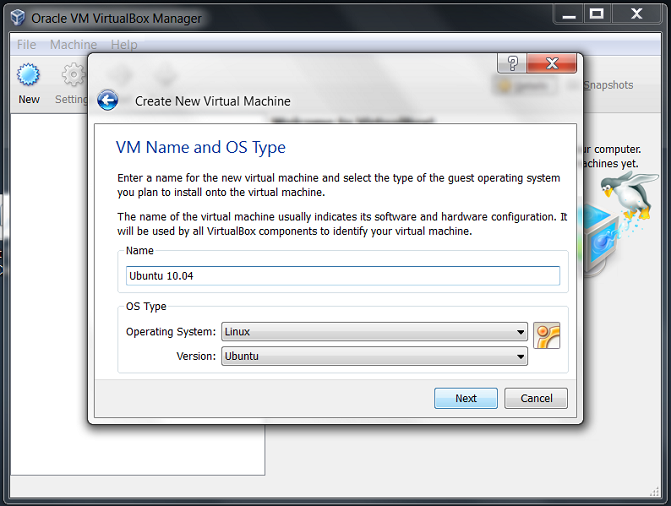
Click next on the first page of the wizard, and then enter a Name for the new virtual machine. Select Linux for the Operating System type and Select Ubuntu for the Version (if you downloaded the 64 bit Ubuntu, select "Ubuntu (64 bit)"). Then click next to continue the wizard.
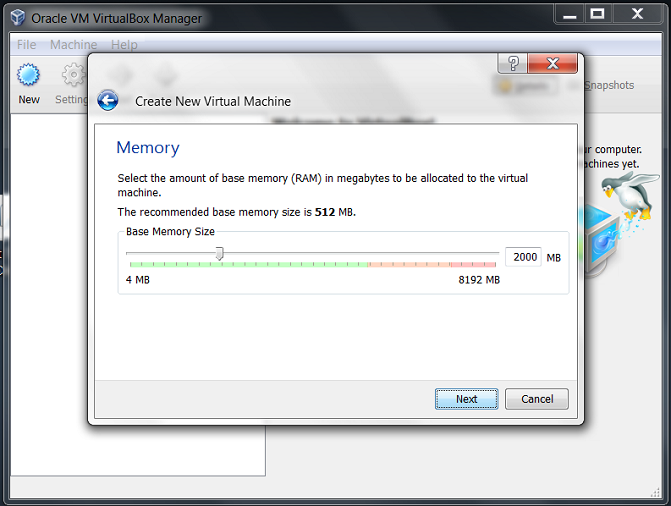
Now you need to select how much Memory to give to the virtual machine. Depending on how much RAM you have in your computer, you'll want to give the VM a decent amount of memory (1 or 2 GB will probably work in most cases). Just be careful not to give more than half the available memory to the VM, since your host OS needs memory to run, too. When you're finished specifying the amount of memory, click next.
We want to create a new (virtual) hard disk for the VM, and so just click next.
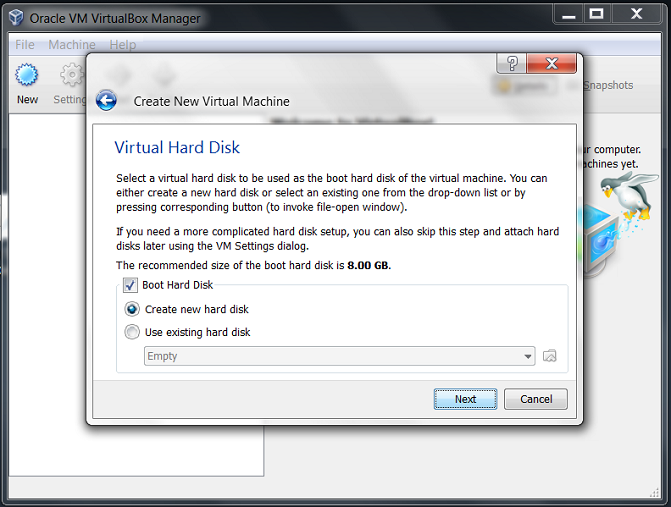
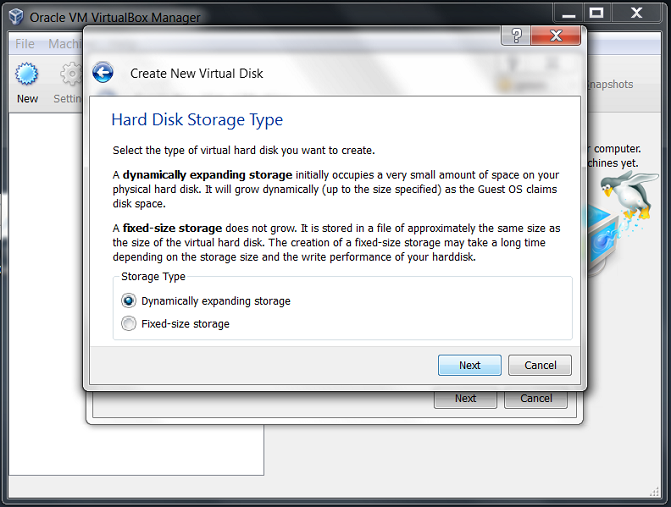
Click next on the first page of the Virtual Hard Disk Wizard, and choose the kind of hard disk file you want. I would recommend the default--dynamically expanding storage.
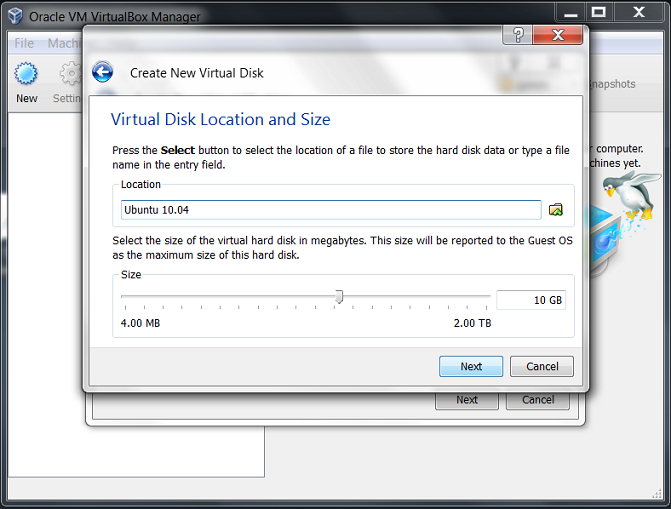
On the next page of the wizard, give a name to your virtual hard disk--the default is the same name as your VM name. Also pick how big you want the hard disk of the virtual machine to be. Ubuntu doesn't require too much hard disk space itself, and the files you'll create for this class shouldn't take up too much space, but I'd go ahead and give it 8 to 10 GB if you've got it to spare.
Finally, click Finish in both wizards to complete the creation of the virtual machine.
Step 4: Installing Ubuntu on the Virtual Machine
Before starting your virtual machine for the first time, you'll want to set it up to boot from the .iso image file that contains the Ubuntu installer. Click on Storage in the panel on the right to bring up the Storage Settings and click on the CD icon that says "Empty" next to it. Over on the right, click the CD icon to bring up the drop down menu and click "Choose a virtual CD/DVD disk file..."
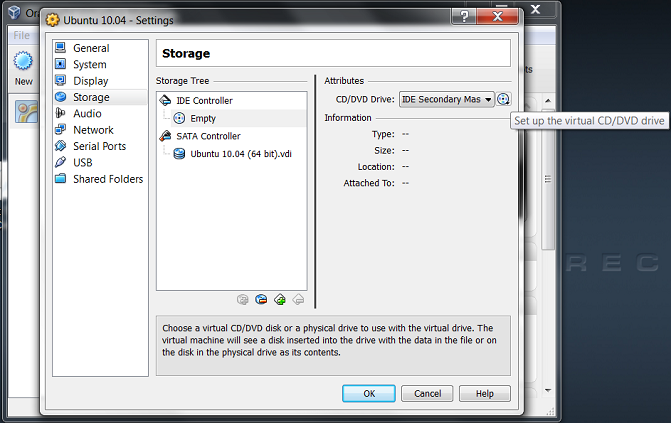
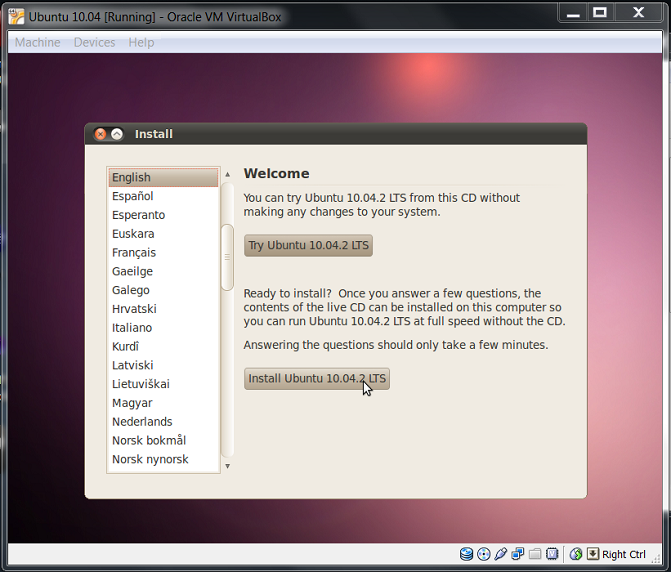
Browse to the .iso file that you downloaded earlier and click Open and then OK to attach it to the VM. Now you can click the Start button to start your virtual machine. You will get several informational dialogs that will pop up, which would be a good idea to read through once. When the Ubuntu install window comes up, click on "Install Ubuntu" instead of "Try Ubuntu." Follow the onscreen instructions to install Ubuntu on the virtual machine's hard disk.
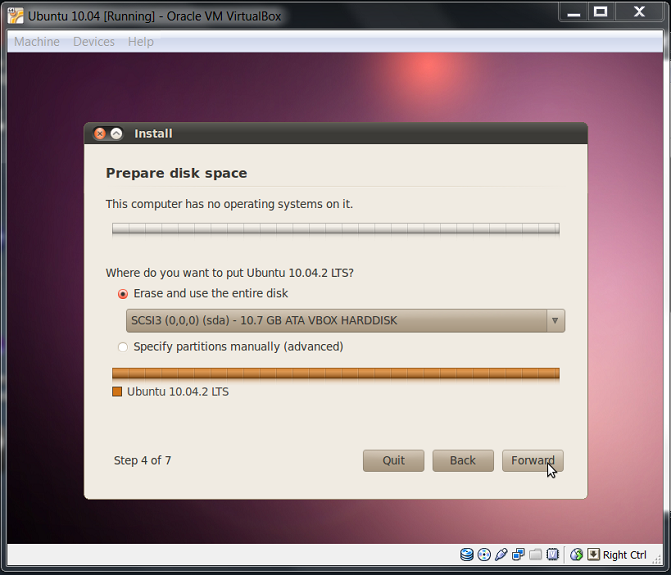
The instructions are fairly self explanatory except when you need to choose where on the hard disk to install the operating system. Since this is inside our virtual machine, it is referring to the virtual hard disk we created, and not the actual hard disk in the computer. Just leave the default settings of "Erase and use the entire disk" and click Forward. Don't worry about losing any data--this only affects the virtual hard disk file.
Step 5: Installing the Ubuntu Guest Additions
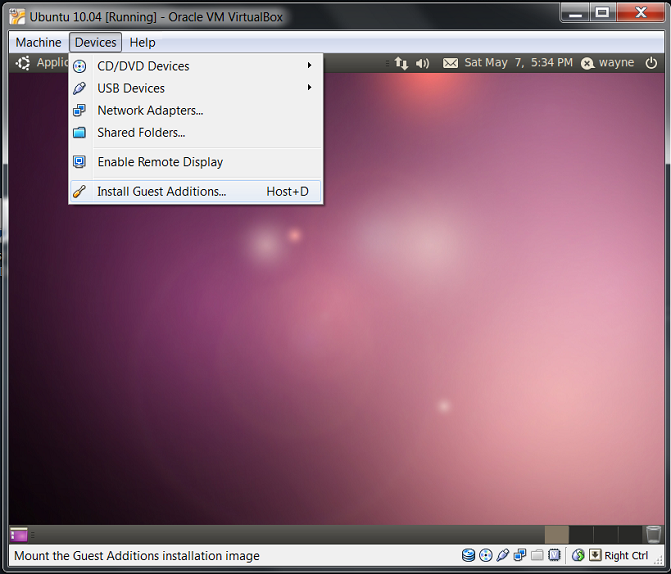
Ubuntu will behave better if you tell it that it's running inside a virtual machine. To do this, click on the Devices menu in the VirtualBox window your VM is running in and select "Install Guest Additions..."
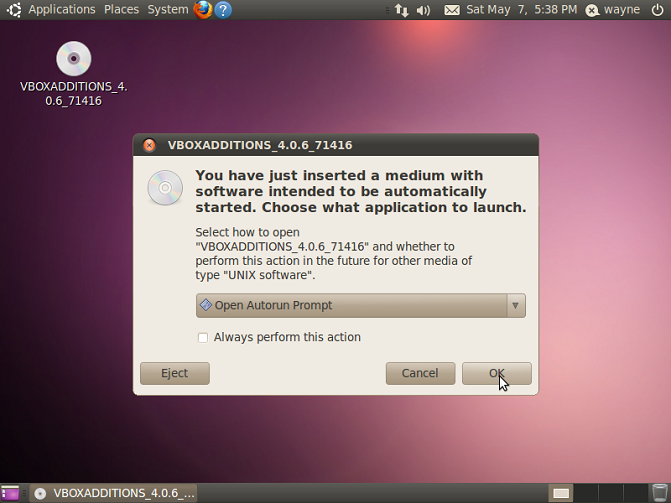
Click OK when Ubuntu asks if it can autorun the VirtualBox Additions, and then click Run to start the installation. You'll have to give your password in order to continue.
After you're done, you can eject the VirtualBox Additions CD File from your Ubuntu machine by right clicking on the CD icon on the desktop and clicking Eject. When you restart your computer, you should be able to use the fullscreen feature, etc.
Step 6: Go Exploring!
Now for my favorite part--exploring the brand new world just opened up to you. There's lots to learn about Ubuntu and Linux in general, and from here on out, the hand-holding ends and you're on your own. I would strongly suggest going through the Linux Tutorial to get your feet wet with the basics. Another great resource is the Ubuntu Forums, where you can find answers to lots of questions that people have already had. Whether your question is general or specific, try searching the forums and see what you come up with. If that doesn't work, you can usually find links to good forum entries on a Google search.
A couple quick tips before concluding:
- The best way to install packages or libraries in Ubuntu is by going to System > Administration > Synaptic Package Manager. Search for the name of the package you need, and make sure to get the right version. For software development packages like the ones you need for the Chess Project, you'll need to be sure to mark the "[packagename]-dev" package for installation in order to get the header files. Also note that sometimes you can find an elusive package by putting "lib" in front of the name when searching.
- Instead of shutting down your virtual machine every time, you can just click the x in the virtual machine window and select "Save the machine state." This saves the state of the VM right where it is so that you can start from that state later. This is often quicker than waiting for Ubuntu to shut down and boot up. Be aware, however, that in order to change settings on your virtual machine, you'll have to shut down the VM completely.